Intel SSD Raid Guide and Benchmarks
Dane-Elec SSDs
Recently I came across a good deal for two Intel 80gb SSDs. However, they are first generation Intel SSDs, with no TRIM (discard) support, but that’s OK because the plan was to use them in a cheap motherboard RAID 0. Motherboard raid configurations do not support passing through the TRIM command to the devices. This means that paying a premium for TRIM would be a waste of money anyway.
Before running any benchmarks, I made sure to upgrade my device to the latest firmware available. To do this, I visited http://downloadcenter.intel.com and downloaded the latest SSD firmware cd. For the firmware update cd to see your drive you must set your drives to IDE mode. Some BIOS’s also require that you set the IDE mode to ‘compatible’ or ‘legacy’. I burned and booted the CD then performed the update. It is possible that the firmware will update and succeed with “Firmware already updated on this drive.”
Benchmark setup
All benchmarks were performed with a clean installation of Windows 7. Between each installation the drives were ‘secure erased.’ This is a factory reset that allows the G1 devices to return to a clean slate. This was required to avoid speed degradation effects that the latest firmware has mostly fixed. To do this on an Intel SSD you need HDDErase v3.3, newer versions have an incompatibility. I injected HDDErase into a FreeDOS ISO.
To use this HDDErase ISO image.
- Burn it to a CD
- Enter your bios, change SATA mode to IDE/compatibility.
- Boot the CD
- Select “1. Continue to boot FreeDOS from CD-ROM”
- Select “1. Install to harddisk using FreeDOS SETUP (default)
- Pick a language
- Select “Run freedos from CD-ROM”
- cd hdderase
- hdderase
I had to ‘unfreeze’ the drive and reboot, the second time through it works. There is both ‘Secure Erase’ and ‘Enhanced Secure Erase’ apparently both work the same. It should take no more than 2 minutes to erase.
Hardware
- Motherboard: Asus P5K Premium (chipset P35 / ICH9R)
- CPU: Intel Core2 Duo Xeon 3110 (E8400 Equivalent)
- Memory: 8GB DDR2
- Storage: 2x SSDSA1MH08 (Intel X18-M 80gb SSDs)
There were four configurations tested:
- Single SSD
- Intel Matrix RAID0
- Intel Matrix RAID0 with write-back caching enabled
- Windows 7 Software RAID0
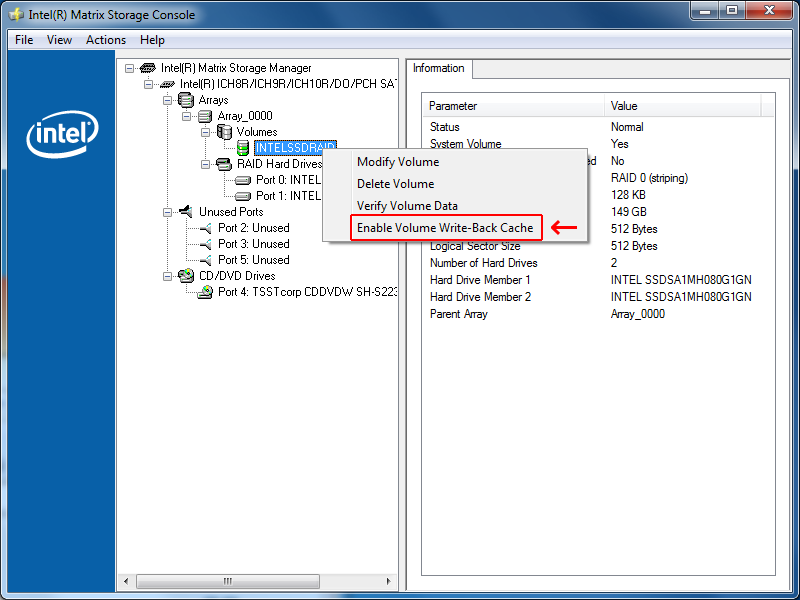
Enable Intel Matrix Writeback Cache
For the single SSD configuration and the Windows 7 software RAID configuration, the drives were put into AHCI mode. For the motherboard RAID configuration, the bios was set to RAID such that the Intel Matrix RAID utility starts after the BIOS. Where not mentioned, settings were left to default. For instance, the motherboard raid stripe size defaulted to 128kb (coincidentally, I read this is the erase block size of the SSD). All benchmarks used default settings.
The motherboard raid was setup in the BIOS. For the write-back caching testing, write-back was enabled in the Intel Matrix Console in Windows.
Unfortunately, it does not appear possible to boot Windows 7 from a software raid. The Windows7 raid was made after installing the OS on a single drive.
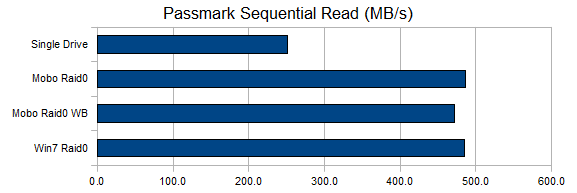
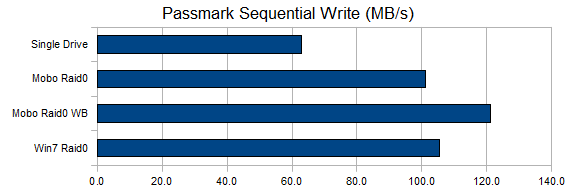
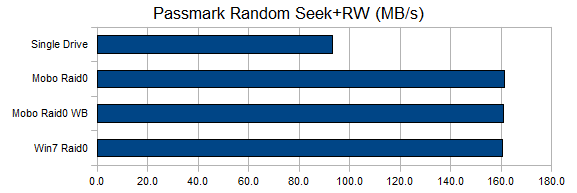
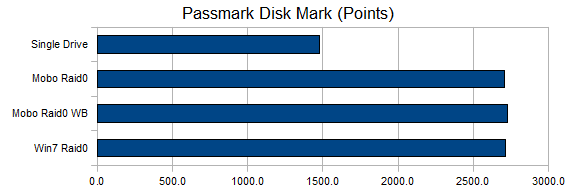
The following four charts were benchmarked with Passmark V7.0 (Build 1012) Win64.
HDTune 2.55 would only benchmark physical drives, and not partitions. So Windows software raid is not included on the following two charts.
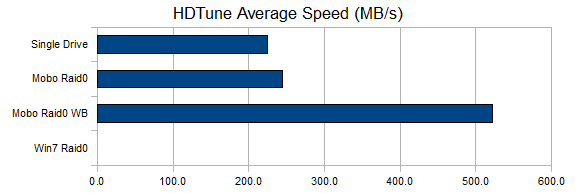
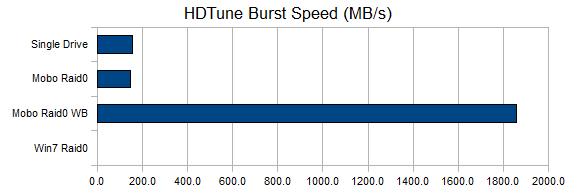
The main conclusion to be drawn from this is that the RAID method doesn’t seem to matter that much when the storage devices are this good. The Intel SSDs provide nearly linear scaling when inserted into a RAID0 configuration, which is quite remarkable. With magnetic hard drives it is hard to get much speed bonus with a RAID. It does appear that write-back caching has some magical bonuses, especially in the older HDTune benchmark. Indeed, the system does feel a tad snappier with write-back caching enabled. But be aware that write-back caching is a data integrity risk. If you experience a power or system failure write-back caching can cause file loss or damage of any files written.