TCP-over-DNS tunnel software HOWTO
Q: How do I get free internet where I should have none?
A: Use tcp-over-dns tunnelling software.
We’ll show you how.
##How it works
DNS stands for “Domain Name System”. The purpose of DNS is convert a domain name, such as “analogbit.com” to an ip address, such as “208.113.168.166”. The interesting thing about DNS queries is that they are usually recursive queries. This means that if a server doesn’t know the answer for a domain name, it is allowed to ask other servers for the answer. So while a firewall or restrictive ISP may filter regular internet traffic they probably overlooked DNS traffic.

tcp-over-dns data flow diagram
The tcp-over-dns client will encode data in an address and sends that out to the ISP’s dns server. The ISP’s dns server then realizes it cannot answer the question, so it forwards it onto the tcp-over-dns server. The tcp-over-dns server decodes the client’s data from the address and encodes the server’s data in the answer that is sent back to the client.
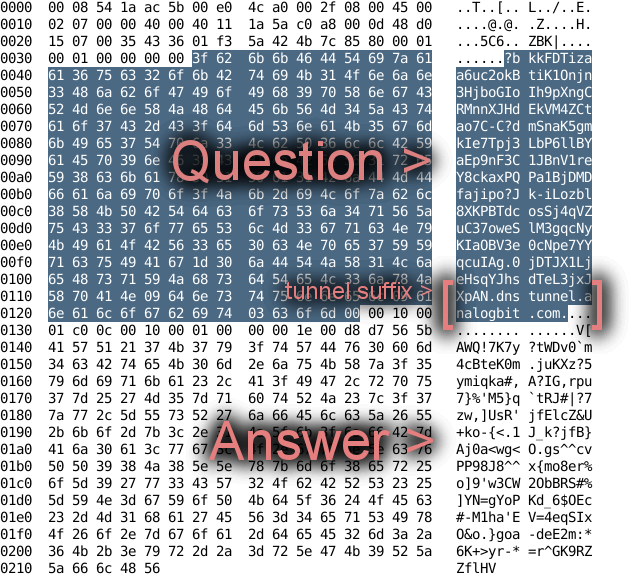
Hexdump of tcp-over-dns packet
There are many things working against the efficiency of the tunnel. There are certain restrictions about what characters may be in a domain name (a-z, A-Z, 0-9, hyphen) so data is converted into the appropriate character set before transmission. The server’s answer to a query also has many restricted characters, so it too must do the same thing with a different set of characters. Every query that is answered by the DNS server must also include the question in the response. The combination of these restrictions means the total data transmitted is not very efficient compared to the number of bytes actually sent.
##Requirements
- An internet connection that has been intentionally crippled by the connection’s administator. A candidate connection will filter normal internet traffic, but it will allow DNS queries through. You can tell if it will work if when you ping a server you can get its IP address but all ping/tcp/udp packets are lost.
- Server under your control where you are the root or administrator user. You need to be able to set up a server to listen on the DNS port (port 53). This can be a machine you are running at home, most (all?) ISPs do not filter dns traffic.
- A domain name that you can use to direct queries to your server.
- tcp-over-dns server and client software, as well as a functional Java Runtime Environment. It’s free!
##Step 1 - Set up the domain
First you need to point the domain to the location of your server. If you want to squeeze out a few more bytes per query, try to keep the domain name as short as possible. Ultimately we need two DNS records. One that says that there is a name server for *.dnstunnel.domain.com. The next record says where you can find the ip address of the aforementioned nameserver.
###Method 1:
If you have direct access to the the DNS record you can add something like this to the bottom of it:
;set up the DNS tunnel
$ORIGIN dnstunnel.analogbit.com.
@ IN NS ns.analogbit.com.
ns IN A <server ip>
###Method 2:
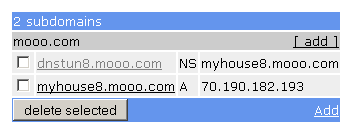
Okay, maybe I’m a cheapskate, I don’t actually own a server where I can edit the DNS record directly. However I am in luck. Some of my users have brought http://freedns.afraid.org to my attention. You can use afraid.org with tcp-over-dns without even registering a domain name.
Set up any two subdomains so they look like the following:
freedns.afraid.org setup
Make sure you replace the A record with the ip address of your server. You can use various clients to update this A record automatically if you ip address changes. Read more about it on afraid.org’s webpage.
###Method 3:
Many hosting companies let you edit your DNS record through a web interface.
Heres what it looked like when we were hosted on Dreamhost:
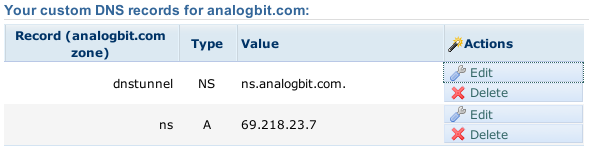
Dreamhost DNS Setup
##Step 2 - Setup the server
Download and extract the tcp-over-dns software to the server machine you are using.
Choose a port on the server you want the client to be able to access. Currently, there is no authentication, so keep security in mind. This works on any OS that runs java, and both TCP and UDP traffic is tunnelled through, so really any application you wish to use should work. Please note that you need to have a program running and listening on the –forward-port. You will connect to this program through the DNS tunnel.
Some of the best choices are:
- Proxy server (for basic web browsing)
- An openssh server on linux (for controlling the server and also works as a proxy)
- VPN server (your computer appears on the home network)
- VNC server (for access to your desktop at home)
- The best choices are either the SSH port (22) or a VPN port. I am primarily using this for SSH access with optional proxy support, so I will use port 22. VPN adds network overhead and since I don’t have that much bandwidth I am going to go with SSH in this example.
As root/administrator, run the server:
java -jar tcp-over-dns-server.jar --domain dnstunnel.analogbit.com --forward-port 22The above line causes the server to begin listening on the DNS port for client machines that it will tunnel traffic to port 22.
##Step 3 - Set up the client
Download and extract the tcp-over-dns software to the client machine you are using.
Run the client:
java -jar tcp-over-dns-client.jar --domain dnstunnel.analogbit.com --listen-port 60022 --interval 100This starts the client and it begins listening on port 60022 for data to tunnel to the server’s port 22. With an interval of 100 milliseconds it sends 10 dns requests per second to the server (if you have access to a fast network you might want this as low as 5 or 10, but keep in mind it eats a lot of bandwidth in overhead).
##Step 4 - Try it out
On the client, attempt to connect to the server.
ssh -C -p 60022 localhostOr, if you want a proxy that you can use with web browsers or instant messengers:
ssh -C -p 60022 localhost -D 8080Hopefully that worked. If not you can turn on higher levels of logging with the –log-level command line option, it may help. No data will be sent until a packet is received on the client end. There are some batch files and bash scripts included to make running the client/server a little easier.
Thats it!